Monday, March 23, 2009

An Adventurous Sunday Dinner!

Coq au vin (French: "rooster in wine") is a French fricasee of chicken cooked with wine, lardons (bacon), and optionally garlic.

Older chickens are traditionally used because they contain a lot of connective tissue, which creates a richer broth when cooked.


This is a dish I have never had, but have always wanted to try. While working on some other things, I had the Food Network on in the background and the show that was at the time, "Rescue Chef", was highlighting this very dish (in fact, all three dishes), and I decided, what a great idea for a Sunday dinner!

Many recipes for Coq au vin are complex, and there are several ingredients, but this recipe was quite simple. This is also a dish you can WOW your friends when you invite them to dinner (They'd really appreciate it if you invited them to dinner!)

Click here for all 3 recipes: "Go To" Dinner Party


This is definitely a recipe where "pre-prep" is very helpful!


Start off by heating some unsalted butter and olive oil in a large heavy pot or dutch oven and sear your chicken pieces on both sides. Be sure to only cook a few pieces at a time because if you crowd too many pieces together, you're going to steam the chicken rather than sear it and won't get the desired results. Keep in mind at this step, the chicken will not be fully cooked, so don't go nibbling or you're going to regret it!


Remove the chicken to a seperate tray or pan and add your pieces of bacon. Cook these until they're browned.


Next, add your mirepoix (carrots, celery & onions) and cook for about 2 minutes.

Now this recipe says to blanch, cook and peel your pearl onions for the dish. I HATE trying to peel pearl onions, so as a time saver, you can buy peeled pearl onions in the frozen veggies section of the supermarket. I use those and they work just fine!


Now comes the fun part, pour in the brandy and deglaze the bottom of the pot. Please be careful, brandy is flammable, and if your burner is up too high, there's a possibility it could ignite!

Be sure to scrape all those lovely browned bits off the bottom of the pot and add your flour, stirring and cooking for about a minute.


Add the thyme sprigs, mushrooms and pearl onions and give it a good stir to mix it all up!


Return the chicken pieces to the pot, this time you can fit them all snuggely and add your chicken stock. Simmer for about 5 minutes.


Now, more booze!!!! Add the entire bottle of red wine and your bay leaves!


Cover and place in the oven for an hour and a half, until the chicken is cooked through and quite tender!


While that's in the oven, prepare your "mash"! We're using a mix of turnips and parsnips. These are two very delicious root vegetables and this is a great alternative to mashed potatoes! Turnips are high in Vitamin C. Parsnips are related to the carrot and are richer in vitamins & minerals than carrots. They're very rich in potassium and high in dietary fiber!
After you've peeled and sliced your turnips and diced the parsnips, add them to a large saucepan and cover them with cold water. Add some kosher salt and bring to a boil over medium heat. Continue to boil the vegetables for about 8-10 minutes.


Drain the vegetables, placing them back in the pot. Add some butter and chopped fresh thyme and mash them all together with a potato masher. Season with salt and pepper, to taste.


Serve the Coq au vin along with the sauce and vegetables ladled over the mash and you've got a fantastic, hearty dinner!


Now for dessert. These tarts can be made in advance. You'll want to serve them at room temperature.
On a parchment lined baking sheet, place the puff pastry (cut into 4 even squares), evenly spaced.


Create a border around the inside of each square by scoring about a 1/2" from the edge all around the square. Prick the dough, with a fork, on the inside of the smaller square. Cover with plastic wrap and refrigerate for at least 30 minutes and up to 1 day.


Overlap thin slices of apple and nectarine within the border of each pastry square. Brush the fruit with melted butter and sprinkle with a teaspoon of sugar each.


Bake the tarts until pastry is golden and puffed around the edges. About 20 minutes.


Remove from the oven and drizzle each tart with a teaspoon of honey, and let cool. While the tarts are cooling, whisk together some mascarpone cheese and some orange liqueur.


Top each cooled tart with a dollop of the flavored mascarpone, serve and enjoy!

Saturday, March 21, 2009

Mini Honey-Mustard Meatloaves with Roasted Potatoes

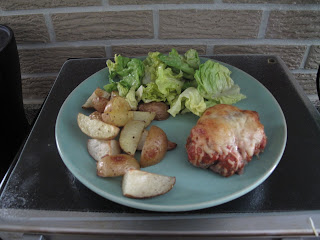
Saturday nights dinner was something different. Taking a cue from Sandy Gluck and the Everyday Food Radio Show on Sirius 112 & XM 157, I decided to make these delicious little meatloaves. The recipe also included a simple side of roasted potatoes and a green salad.

As usual, ingredients are assembled: Ground chuck, eggs, a mix of ketchup & honey-mustard, some shredded white cheddar cheese, panko bread crumbs, salt & pepper.


After mixing all the ingredients together, in typical meatloaf fashion, shape into small loaves and place on an oiled baking sheet. Brush the ketchup & honey-mustard mixture on each loaf.

Then top each loaf with about 1 oz of the remaining shredded white cheddar.


On a seperate baking sheet, toss the potatoes with a little olive oil, salt & pepper. Place both trays in the oven, potatoes on the bottom, meatloaves on the top rack. Bake for 10 minutes then rotate trays. Cook meatloaves for an additional 10 minutes and the potatoes 5 minutes longer.


While that's baking, prepare the salad by whisking together some honey-mustard and red wine vinegar.


Tear the lettuce into bite-sized pieces, add to the bowl and toss with the dressing. How simple was that? (Don't ask why the photo is sideways. It wasn't taken that way and isn't that way on the SD card but Blooger insists on uploading it that way!)
When everything is done, plate it up and enjoy a new twist on comfort food!


Friday, March 20, 2009

Jeannie In A Bottle?

One of my absolute favorite TV shows, growing up, was "I Dream Of Jeannie".

"I Dream of Jeannie" was a 1960s American sitcom. Produced by Screen Gems, it originally aired from S
eptember 1965 to May 1970 on NBC. The show ran for five seasons and produced 139 episodes. The first season consisted of 30 episodes filmed in black and white. The other 109 episodes were filmed in color. The show has continued to air in reruns ever since.

Though it was not the shows main characters that I enjoyed so much. For some odd reason, it was Jeannie's bottle that always held my attention! And to this day, I still want a room decorated to match the interior of her bottle!

Jeannie's famous bottle was not created for the show. The actual bottle was a special Christmas 1964
Jim Beam liquor decanter containing "Beam's Choice" Bourbon Whiskey. It was designed by Roy Kramer for the Wheaton Bottle Company.


For years it was said that Sidney Sheldon, the shows creator, received one as a gift and thought it would be a perfect design for the series. Several people in the Screen Gems art department also take credit for finding the bottle. There is strong evidence, however, that it was first season director, Gene Nelson who saw one in a liquor store and bought it, bringing it to Sheldon.

Jeannie's bottle was left its original dark, smoke-green color, with a painted gold leaf pattern (to make it look like an antique), during the first season. The plot description of the pilot episode in TV Guide, in September 1965, referred to it as a "green bottle". In that first episode, it also looked quite rough and weathered. Since the show was originally filmed in black and white, a lot of colors and patterns were not necessary. When the show switched to color, the prop people came up with a brightly colored bottle to replace the original.

Over the years, I've collected these bottles, finding a lone one at tag sales, or a flea market, as well as obtaining a few on eBay.
Here is one of my original 1964 Jim Beam bottles, unpainted, and still has the labels on it, along with the state "tax stamp", and part of the seal.


Here is another 1964 Jim Beam bottle that has been painted to match the bottle used for the first season of "I Dream Of Jeannie" with the gold vines and leaves.
NOTE:
The first season bottle had a clear glass stopper that Tony took from a 1956 Old Grand-Dad Bourbon bottle in his home, as the original stopper was left behind on the beach where Tony found Jeannie
. These glass stoppers are extremely rare and hard to find. It's a highly sought after piece for Jeannie Bottle collectors. One such stopper recently sold on eBay for $475!


Here is another Jim Beam bottle that has been painted in the design we are all familiar with!


The Jim Beam bottle, below, was one that I tried painting myself! Not that much of an artist, I must say it wasn't too bad, though I just couldn't match up that shade of "metallic purple" used in the show.


The 2 "I Dream Of Jeannie" reunion movies, "I Dream Of Jeannie 15 Years Later (1985), and "I Still Dream Of Jeannie" (1991) again used Jim Beam bottles, but with a new, more dramatic paint job.


Not sure if it was due to the success of the show or just "repeating" past designs, Jim Beam released other bottles, similar in design to the original "Jeannie" bottle from 1964. These bottles were colored, and had a "Handle" attached to the bottle. The stoppers, though the same design, were flat on top and did not contain the "point" as the original bottle stopper did.
On the left the blue bottle contained "McGill's Canadian Whiskey", as stated on the label, and came out in 1973. The bottle on the right was "Beams Ruby Crystal Bourbon". This came out in 1980. There was also a clear glass bottle that matched the blue and red ones, with a handle. I did have one of these clear glass bottles, sealed, still containing the bourbon, but unfortunately, it was recently destroyed, by accident, as it fell from the shelf it was displayed on.


Below is a photo of another, unpainted, 1964 Jim Beam bottle. As you can see through the stopper, the bottles, though dark colored, are actually transparent.
The bottle on the right was an "eBay find". It's actually a ceramic replica of the Jim Beam bottle painted with a "Gay Pride" design. The stopper is permanently attached to this bottle.


Some more eBay finds, below left, another ceramic replica of the "purple" bottle, without a stopper. The bottle on the right was a promotional item given out at the, now defunct, Aladdin Hotel & Casino in Las Vegas.


Other fun "I Dream Of Jeannie Items" I've collected, below, a metal lunch box and Mattel released a limited edition "I Dream Of Jeannie" Barbie doll complete with a mini Jeannie Bottle.


Most recently Sony Pictures Home Entertainment released the entire "I Dream Of Jeannie" series in a DVD Boxed set. The set includes 20 DVDs featuring all 139 episodes, as well as fun extras (note the entire first season has been "colorized" in this set). Also included is a limited edition "Jeannie bottle" that holds all 20 DVDs. The set also includes 55 collector's cards with never before seen photos, episode synopses, trivia and cast profiles!

Thursday, March 19, 2009

Return Of A Childhood Favorite!

Growing up in the Detroit Area, we've always had our share of "Detroit-Made" foods. Vernors Ginger Ale, Faygo & Towne Club Pop, Better Made & New Era Potato Chips, Sander's Hot Fudge, Strohs Beer, etc. Some have come and gone, and many are still around, some even over 100 years old and still as popular as ever!

One item, in particular, that I remember fondly from my
childhood was Velvet Peanut Butter! It was the ONLY peanut butter my mother bought when I was growing up!


"Fresh...Pure...Delicious"

Perhaps nothing says peanut butter to generations of Metro Detroiters more than those three words -- the familiar pledge of Velvet Peanut Butter. The jar with the yellow label and a freckled-faced boy grimacing under each word was a household staple for decades.

Velvet Peanut Butter disappeared from store shelves more than 20 years ago, but the beloved brand is making a comeback thanks to the aspirations of a Michigan native now living in Georgia.

Eric Bruce, a marketing research director for a television station, has resurrected Velvet Peanut Butter because he was tired of seeing Detroit brands disappear or their production moved elsewhere. He began making the peanut butter at a plant in Fitzgerald, Ga., late last year and shipping cases to Hiller's Markets here in Michigan.

Nostalgia and Hiller's promotion of Michigan products helped the grocer sell 1,200 jars of Velvet in the first five weeks. The peanut butter is now also available at Oak Ridge and Westborn markets, and plans call for other stores to carry the brand as well.

"Sales really took off," Bruce said. "It has far exceeded my expectations. I know it's just peanut butter, but you're really selling people their hometown and memories."


Created in Michigan

Velvet Peanut Butter traces its roots to a two-car garage in Detroit in 1937. The peanut butter made by Paul Zuckerman became so popular that he expanded his operations three times in Detroit before establishing a plant in Livonia in 1963, where it was made until the family got out of the business in 1985. The peanut butter also was sold in Indiana and Ohio.

Now, Bruce and his wife, Kim, also a Michigan native, are making Velvet using the same recipe. They bought a warehouse in Michigan and hope to make the peanut butter here eventually.

"It shows our commitment to Michigan," said Bruce, 42. "I'm hoping to bring this company back."

It's a challenging time to sell peanut butter because of the recent salmonella scare and with schools removing peanut products from menus because of allergies, said Fred Marx, a partner with public relations and marketing firm Marx Layne and Co. in Farmington Hills.

Still, Marx believes Velvet will receive a warm welcome in Metro Detroit, where many beloved brands have been purchased by conglomerates and their products made elsewhere. "People are nostalgic for this peanut butter," he said. "While there is competition, in this marketplace, I think people remember it fondly."

Addressing concerns about salmonella, Bruce said every product batch is tested before shipping.

Norbie Zuckerman, the founder's son and whose face graces the label, said he and his mother, Helen, are delighted to see the brand return. "It's a great product," he said. "We think it's great for Detroit."


Welcome back Velvet!!


UPDATE: Velvet Peanut Butter should be available in Kroger Supermarkets starting in May 2009!

Wednesday, March 18, 2009

Coconut Layer Cake - YUM!!!!

For me, baking is a way of relaxing. I love to bake and when I feel stressful, that is what I enjoy doing.
Recently, I was watching QVC, something I NEVER do and Paula Deen was on there promoting some of her new prepared food items she has come out with. One of them was a pre-made coconut layer cake that I thought looked amazing. I'm not too big on coconut, though I do enjoy it every once in a while. I decided to make this exact cake using Paula's famous recipe.

The recipe starts out with Paula's "1-2-3-4 Cake" recipe but substituting Unsweetened Coconut Milk for the regular milk.

Unsalted butter, sugar, eggs, self-rising flour, unsweetened coconut milk & vanilla


Creaming the butter until it's fluffy, then add the sugar and continue to cream for about 6-8 minutes.


Add eggs, one at a time, mixing well after each egg.


Add the flour and coconut milk alternately to the creamed mixture, beginning and ending with flour: 1/3 flour...1/2 coconut milk...1/3 flour...rest of coconut milk...rest of flour.


Add the vanilla and continue to beat until just mixed.


Divide the batter EQUALLY among three 9" round cake pans that have buttered and floured beforehand. Tap your pans on the counter a few times to even out the batter and remove any air bubbles in the batter. Bake the cakes in a pre-heated 350 degree oven for 25 to 30 minutes or until a toothpick inserted in the center comes out clean. Remove from the oven and cool cakes in the pan while you prepare the filling mixture. It's also a good idea to put the cake pans onto sheet pans in case the cakes rise too much and some batter spills over. If you do get a "high rise" in the cake, you can always cut off the excess cake, with a long serrated knife, to even out the layers.


The filling ingredients consist of: 3/4 cup sugar, 1 cup sour cream, 4 tablespoons milk and 1/2 cup sweetened coconut flakes.


Stir together the filling ingredients in a bowl until well blended.


Remove first cake layer from the pan and invert onto a cake plate. Using the "wrong end" of a wooden spoon, poke holes approximately 1 inch apart until the entire cake has been poked.


Spread 1/3 of the filling mixture on the cake layer. Top with the 2nd layer and repeat process. Top with the 3rd layer and repeat process again.


Place the cake, at this stage, in the refrigerator overnight (and up to 3 days) to allow the cake to absorb the filling. I like to add skewers through the cake to keep the layers from shifting.


To prepare the 7-Minute Frosting assemble the ingredients: water, salt, light corn syrup (or cream of tartar), sugar, egg whites & vanilla.


Mix together sugar, corn syrup, salt, water and egg whites in a glass (Pyrex) or metal mixing bowl with an electric mixer for 1 minute.


Set the bowl over a pan of rapidly boiling water, making sure the water does not touch the bottom of the bowl. Beat constantly on high speed for EXACTLY 7 minutes.


Remove the bowl from the pan and gently stir in the vanilla with a spatula. This icing is great for icing any cake or cupcakes!


Immediately frost the entire cake, top and sides, with the frosting and don't worry about beauty here. The entire cake is going to be covered in coconut!


Sprinkle top and sides of cake with plenty of sweetened shredded coconut!

The easiest way to cover the sides is to take a (clean) hand full of coconut and gently press the coconut onto the sides of the cake, all the way around. Yes, it's going to get messy, but be sure to work over a large plate or sheet pan to capture the falling coconut as this can be saved!


Of course, I couldn't resist! Try it and impress someone! Be sure to let me know how yours turned out!