Showing posts with label Food. Show all posts

Thursday, September 9, 2010

Mario's Weekend Cooking Challange: Blackberry-Blueberry Crumble

Mario's Weekend Cooking Challenge is a Facebook Group for people to get together, once a month and cook the same recipe, compare notes and discuss outcomes. It is put together by Mario Bosquez host of "Living Today" on Martha Stewart Living Radio, Sirius 112 & XM 157

This months challenge was a "sweet" one! Blackberry Blueberry Crumble. A delicious mix of some of summer's tastiest offerings! The fast and simple recipe was provided by Chef Kate Goodyear and can be obtained here: Blackberry-Blueberry Crumble

First, you want to combine your berries, with some brown sugar, cornstarch and lemon juice.

Place your berry mixture into a 9 x 13 baking dish.

Mix together your topping ingredients of flour, oats, white & brown sugar, ground ginger, salt and butter. Mix it, by hand (make sure you wash your hands first!), to obtain medium to large "crumbles".

Spread the topping evenly over the berries.

Bake at 350° for about 40-50 minutes until it's golden brown & bubbly! The scent of this baking is heavenly!

Serve this warm or at room temperature with a generous scoop of buttermilk or vanilla ice cream!

This treat couldn't be easier to prepare and will be loved by all! You can also substitute other berries, as well as stone fruits like peaches and plums!

Summer Corn Pudding!

Now is the time of the season to experience one of my favorite vegetables, CORN!!!! This is the time of the year when corn is at it's best, so crisp and sweet!

I took some time to visit a local farm stand and am enjoying this rewarding bounty!

Photobucket

Here's some of the corn as I prepare to shuck it!

Other than straight off the cob, with a little butter and freshly ground black pepper, I wanted to share another, and different way, of enjoying fresh corn. This recipe is for Corn Pudding and is such a favorite! It was delicious nice and warm from the oven and it's equally enjoyable chilled from the fridge the next day!

You can get the recipe here: Corn Pudding.

To make the corn pudding the first thing you must do is remove the corn kernels from the cob. Be sure to get all that yummy milky liquid that exudes from the cob.

Photobucket

This is generally done standing the cob up in a bowl and "scraping" a chef's knife down the cob. Of course, there are tools available to make this job easier such as this Corn Stripper.

Here I have all the ingredients assembled to make this sweet & savory pudding

Photobucket

The corn kernels, fresh eggs, butter, cream cheese, sugar, baking powder and a little salt.

Photobucket

Mix all the ingredients together in a bowl until all combined.

Photobucket

Ready for about an hour in the oven!

Photobucket

All baked and smells so good, but it must cool before diving into it!

Photobucket

Serve this as an anytime treat this summer. It's great as a unique side dish!

Enjoy some more mouth-watering corn recipes this summer by clicking here: Summer Corn Ideas!

Saturday, July 31, 2010

Mario's Weekend Cooking Challange: Grilled Pizza with Fontina, Tomatoes & Basil

Mario's Weekend Cooking Challenge is a Facebook Group for people to get together, once a month and cook the same recipe, compare notes and discuss outcomes. It is put together by Mario Bosquez host of "Living Today" on Martha Stewart Living Radio, Sirius 112 & XM 157

This month's weekend Cooking Challenge
was Grilled Pizzas! Something I've never done before, pizza on the grill, was not only scrumptious, but quick and easy! Try this at your next cookout and get your guests, including the kids, involved in making pizzas to their liking!

The recipe for this month's cooking challenge was provided by Chef Jamie Gwen and can be found here: Grilled Pizza with Fontina, Tomatoes and Basil.

Because I was pressed for time, I did use a pre-made pizza dough bought from one of my favorite Italian Markets, Nino Salvaggio. Shape the dough as thin as you like and the point here is to make the pizzas look rustic and hand-made. If you prefer that perfect round shape, use the inside of a "Cool-Whip" lid as a template and also remember, when working with pizza dough, always pull from the center out underneath the dough and not stretch from the top or else the dough springs back to it's original shape.

Remember, the recipe is just a guide. Any and all of your favorite pizza toppings will work with this recipe. Be creative! I used minced garlic, grape tomatoes, mushrooms, green bell peppers, basil and fontina cheese.

Brush the tops of your pizza dough lightly with olive oil and place, oil side down, on the hot grill. The dough will begin to get puffy, lightly brush the tops with olive oil, and when you see a nice light browning and grill marks on the underside, using tongs, flip the pizza crust over, onto the coolest part of the grill.

Scatter the garlic and cheeses over the crusts and top with your topping choices. Using tongs, rotate the pizzas around the grill so different sections receive high heat. Check the underside often to see it's not burning. The pizzas are done when the top is bubbly and the cheese is melted.

Sprinkle the tops with torn fresh basil leaves and serve immediately!


Savory Coeur a la Creme with Parmesan Crackers

Recently, I was invited to an outdoor party and was asked to bring an appetizer. Me always wanting to introduce something new and unique to my friends, I found this recipe for a Savory Coeur a la Creme.

French for "heart with cream", Coeur a la Creme is normally served as a dessert, and made in a special heart shaped basket or mold with small holes.
Cream cheese is mixed with sour cream or whipping cream (and sometimes sugar) and placed into the cheesecloth-lined mold. The dessert is then refrigerated overnight, during which time the whey drains out through the basket or perforated mold. To serve, the dessert is unmolded and garnished with fresh berries or other fruit.
This recipe is for a savory version which was delicious and very well received.

Before making the Coeur a la Creme, I needed something to serve it with. Regular store bought crackers are just plain boring and it's usually expected of me to come up with something a little bit "out of the ordinary." so I thought this wonderful Parmesan cracker would do most wonderfully and were so simple to make.

To make the crackers, you'll need:

1 stick (1/4 lb) unsalted butter
3 oz. freshly grated Parmesan-Reggianno Cheese
1-1/4 cups all-purpose flour
1/4 teas. kosher salt
1 teas. chopped fresh thyme leaves
1/2 teas. freshly ground black pepper

Place the butter in the bowl of an electric mixer fitted with the paddle attachment and mix until creamy. Add the remaining ingredients and mix until combined


Dump the dough out onto a lightly floured surface and roll into a 13-inch log. Wrap the log in plastic wrap and place in the freezer for 30 minutes to harden.

Cut the log, crosswise, into 1/4" to 1/2" thick slices. Place the slices on a sheet pan and bake in a preheated 350° oven for about 22 minutes.

Allow the crackers to cool on a wire rack before storing them in an airtight container.

To make the Coeur a la Creme, you'll need:

12 oz of cream cheese, at room temperature
1 cup heavy cream
1 lemon, zested
1 Tbs. freshly squeezed lemon juice
1 teas. kosher salt
1/2 teas. freshly ground black pepper
1 bottle "Major Grey's" Chutney, such as Cross & Blackwell brand.

Place the cream cheese in the bowl of an electric mixer fitted with the whisk attachment and whip until it is firm like whipped cream. With the mixer on low speed, slowly add the cream, lemon zest, lemon juice, salt & pepper. Beat on high speed until the mixture is very thick.

Line a 6" coeur a la creme mold or a 6" fine sieve (all I had was a sieve) with a few layers of cheesecloth, allowing the excess to drape over the sides. Pour the cream cheese mixture into the cheesecloth and smooth the top with a rubber spatula. Fold the excess cheesecloth over the top of the cream. Suspend the mold over a larger bowl. Cover with plastic wrap, and refrigerate overnight.
There should be some liquid in the bowl that has drained from the mold.

When ready to serve, unmold the creme, upside down, on a plate and pour the chutney over the top, allowing it to drip down the sides. Serve chilled with the Parmesan crackers neatly arranged around the creme.

Friday, June 18, 2010

A Frozen Treat To Make Your Taste Buds Pop!

Nothing refreshes in the summer better than a tasty frozen treat on a stick! Here's a delicious ice pop that's not only great tasting, but also a healthy alternative to those boxes of artificially colored sugary water pops you find at the grocery store!

These Mango-Lassi pops combine the summery taste of fresh mango, with yogurt, buttermilk and a small amount of fresh honey!

In the bowl of a food processor or blender, blend 2 cups of ripe mango chunks (can be fresh or frozen) until it becomes a very fine paste.

To that, add 1/2 cup of plain yogurt, 1/2 cup of buttermilk, 1 tablespoon of honey and a pinch of salt. Blend until pale orange and very smooth.

Fill popsicle molds to about 1/4" from the top.

Cover and freeze for about an hour. Then insert the popsicle sticks and freeze for another 8 hours.

Dip the mold in warm water for a few seconds to help dislodge the pops! Enjoy!!

Mario's Weekend Cooking Challange: Mexican Chocolate Cake

Mario's Weekend Cooking Challenge is a Facebook Group for people to get together, once a month and cook the same recipe, compare notes and discuss outcomes. It is put together by Mario Bosquez host of "Living Today" on Martha Stewart Living Radio, Sirius 112 & XM 157
This month's weekend Cooking Challenge we were given a choice of 2 desserts to prepare. A Mexican Chocolate Cake or Magnolia's Famous Banana Pudding. Since I had already made the Banana Pudding a month back, I chose to make the Mexican Chocolate Cake.
This simple cake is easily put together and what makes it different from your regular chocolate cake is the addition of cinnamon which comes through nicely and compliments the chocolate very well!
The recipe is courtesy of Mario Bosquez, himself, creator of the Weekend Cooking Challenge, and can be found here: Mario Bosquez's Mexican Chocolate Cake
Please note: the recipe calls for 1 stick of margarine and 1/2 cup oil. I substituted 2 sticks of unsalted butter and the cake turned out perfectly. Other ingredients include cocoa, flour, sugar, buttermilk, eggs, cinnamon & vanilla.

Start out by preheating your oven to 350 degrees. Combine your butter (or margarine & oil) along with the cocoa and some water in a sauce pan and heat until melted.

In a large bowl, combine the remaining ingredients and mix well.


Combine that with the chocolate mixture and pour into a buttered 12" x 18" cake pan or a nice ceramic baking dish. I've used this lovely fluted oval "oven-to-table" baking dish.

Bake the cake for 20 to 25 minutes or until a skewer inserted into the center comes out clean. Let cake cool on a wire rack while you prepare the icing.

The icing, again another quick recipe, combines cocoa, butter, milk, vanilla, chopped pecans and confectioners sugar.


In a saucepan, combine your butter, cocoa and milk on medium heat just until the butter is melted and small bubbles form around the sides of the pan. Remove from heat.

Stir in vanilla and pecans, then your confectioner's sugar. As recommended by Mario, use only about 3/4 lb of the sugar and it won't be overly sweet.

While the cake is slightly warm, pour the icing over the cake and spread evenly. Decorate the edge with pecan halves, if desired. This cake is best enjoyed still slightly warm or at room temperature!

Thursday, May 13, 2010

Mario's Weekend Cooking Challange: Spatchcocked Chicken With Potatoes

Mario's Weekend Cooking Challenge is a Facebook Group for people to get together, once a month and cook the same recipe, compare notes and discuss outcomes. It is put together by Mario Bosquez host of "Living Today" on Martha Stewart Living Radio, Sirius 112 & XM 157

This month, I had to prepare my recipe on a Thursday since I was stuck working all weekend long.

This month's cooking challenge recipe is Spatchcocked Chicken with Potatoes and is courtesy of Sandy Gluck
, Co-Host of the Everyday Food Radio show on Martha Stewart Living Radio. Sandy is a fantastic and creative chef (she can create a delicious meal out of almost anything!), and fun radio personality. Get 3 different variations of this recipe here: Spatchcocked Chicken


This technique---splitting, then flattening a chicken---yields a perfect roasted chicken in less time than a whole one takes. It also exposes more skin, which crisps up nicely at higher temperatures.

This simple chicken dish utilizes a few basic ingredients and the results are a moist, juicy and flavorful chicken! Ingredients included are a whole chicken (of course), some thin slices of lemon, fresh sprigs of thyme (the first from my herb garden!), some new potatoes & onion.

Now, How To Spatchcock A Chicken (WARNING: GRAPHIC PHOTOGRAPH FOLLOWS!)

1. Place 1 whole chicken, breast side down, on a work surface.

2. Starting at the thigh end, cut along one side of backbone with poultry or sharp kitchen shears.

3. Turn chicken around, cut along other side. Discard or save backbone for stock.


4. Flip chicken over and open it like a book. Press firmly on breastbone to flatten.

Preheat oven to 500 degrees. Season the the chicken with salt and pepper. Gently loosen the skin of the breast with your fingers and insert lemon slices and some thyme sprigs. Place chicken in a roasting pan.

In a bowl, toss potatoes, onion, thyme with some olive oil, salt & pepper. Add this to the roasting pan.

Now, we need to take a moment to discuss proper hand washing and cleanliness when handling raw poultry! It's VERY important that you wash hands thoroughly and often, as well as your work area and ALL utensils to limit the spread of harmful bacteria that can be associated with raw poultry!
Of course, I recommend using these great all-natural products from the new Martha Stewart Clean line available at your local Home Depot and other local stores.


Roast the chicken until the juices run clear when pierced between the breast and leg and an instant read thermometer reads 165 degrees when inserted in the thickest part of the thigh (avoiding bone), which should take about 30 minutes!

Let chicken rest 5 minutes before carving!


Sunday, May 9, 2010

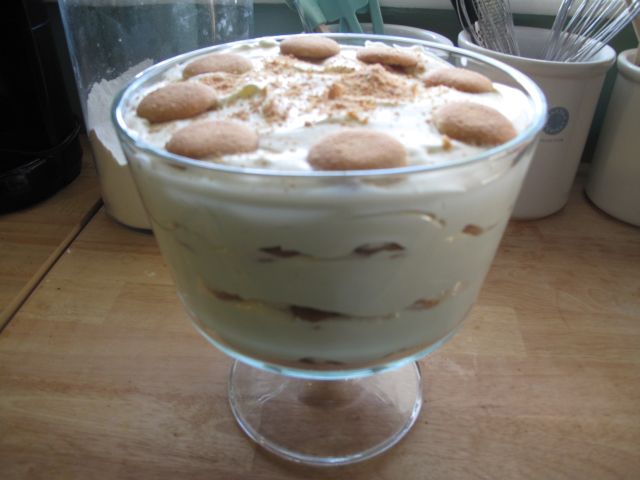
Magnolia's Famous Banana Pudding

This recipe comes from New York City's Magnolia Bakery and was developed by the bakery's co-founder, Allysa Torey, who began making this pudding in her early twenties when she was cooking in a Tex-Mex restaurant. When she opened Magnolia Bakery, she thought it would be a great idea to put it on the bakery menu. It remains the second most popular dessert (after their famous cupcakes) at the bakery.

Though it's not difficult to make, this dessert does take some time. Definitely worth the wait as this is insanely delicious and I can see why it's so popular! The recipe is included in a wonderful cookbook by Allysa Torey, "More From Magnolia".

The pudding starts out by mixing together some sweetened condensed milk, ice water and instant vanilla pudding. Cover and refrigerate for 3-4 hours or overnight until it is set.

After the pudding mixture has been refrigerated, whip up some heavy cream in the bowl of an electric mixer until stiff. Don't over beat or you'll have a lot of butter on your hands!

Gently fold the pudding mixture into the whipped cream until well blended and no streaks remain.


To assemble the dessert, select a large, wide bowl (preferably glass) with a 4-5-quart capacity, like a trifle bowl. Arrange 1/3 of a 12 oz box of Nilla Wafers (no substitutions!), some sliced ripe banana, and 1/3 of the pudding. Repeat this layering twice more, garnishing the top with additional Nilla Wafers or wafer crumbs on the top layer.
Cover with plastic wrap and chill in the refrigerator for 4 hours, but no more than 8 hours! Serve and enjoy!
Why not make this and bring to a BBQ or picnic this summer and you'll be the hit of the party!

Click here for more information on The Magnolia Bakery!